Tunings
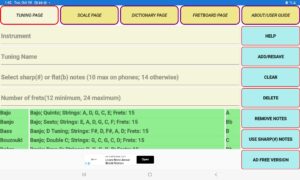

The Tuning Page is displayed when the app opens. The first time users will be asked if they want a Basic or Advanced Installation. The Basic Installation contains only 4 instruments (Guitar, Lap Steel, Bass and Ukulele) while the Advanced option contains a larger selection. Both installations can be repeated anytime using the RESTORE button on the ABOUT/USER GUIDE page. There are 3 lists on the page. The leftmost one contains instruments, the middle list contains Tunings grouped by instrument and the rightmost one contains flat(b) or sharp(#) notes. To see all Tunings for an instrument start tapping the instrument and the tunings will appear in the entry boxes. If you want to enter your own tuning first select any tuning for your instrument. Replace notes by tapping the REMOVE NOTES button and then add new ones by tapping them in the note list. In accordance with music theory flat(b) and sharp(#) notes cannot be mixed but you can switch from flat(b) to sharp(#) notes by tapping the USE SHARP(#) NOTES button. The HELP buttons explain how to use the app and will disappear if you tap on them.
Scales


The Scale Page follows the same conventions as the Tuning Page. The app comes preloaded with several common scales but users are free to add their own. The majority of users will just use the major scale as it is the foundation for Western Music. A scale consists of Whole Steps (equal to 2 frets) and Half Steps (one fret). All scales must contain a total of 12 frets which is equal to one octave. To add a scale enter a name and tap on the interval list for Whole(W) and Half(H) steps until the scale contains 12 frets. You can remove intervals by tapping the REMOVE INTERVALS button. Tap on the HELP message in order to make it disappear.
Dictionary Items

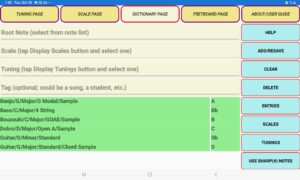
The Dictionary Page is where users can create items of specific interest to them. The app comes loaded with several examples that users can delete and replace with their own Dictionary Items. An item requires a Root Note (representing the key), a scale, a tuning and an optional descriptive tag. To display scales in the leftmost list box tap the SCALES button and then select one. To display tunings tap the TUNINGS button. To return to the list of Dictionary Items tap the ENTRIES button. If you desire a sharp(#) Root Note tap the USE SHARP(#) NOTES button. Tap on the HELP button for an explanation of how to use the page and then tap on the Help message to make it disappear.
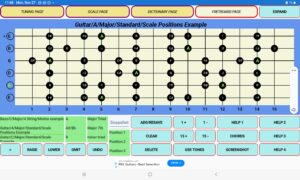
The Fretboard
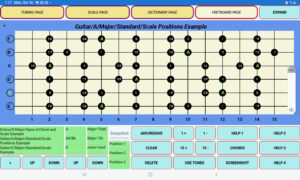

The Fretboard is the heart of the application. Used properly it will speed up your learning curve. The Fretboard contains some rather sophisticated features so we will start with the basics and explain how to use all buttons before moving on to advanced topics. The information contained here can also be accessed from the HELP buttons on the fretboard. Tap the button to see a HELP message and tap the message to make it disappear.
The Fretboard contains 4 listboxes on the lower left side of the screen. The leftmost box contains all your Dictionary items. The next box contains notes. The third box contains a list of chords, scales or diatonic extensions depending on the user’s selection. The final box contains snapshots. A snapshot is an image of the fretboard. Tapping the EXPAND button in the upper right corner will increase the size of the fretboard. This makes for easier viewing on smaller devices.
How to scroll through Dictionary Items, Extensions and Snapshots:

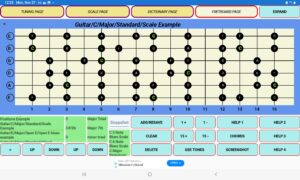
You can scroll through the Dictionary Items by tapping the leftmost set of UP/DOWN buttons. Once you’ve selected an item you can select a note and then tap the rightmost UP/DOWN buttons to scroll through the items in the third listbox. If you want to scroll through the snapshot list select a snapshot first and then use the rightmost set of UP/DOWN buttons to scroll through the snapshots.
How to raise, lower and omit strings:

If you tap the arrow(>) button in the lower left corner the UP/DOWN buttons will change to RAISE/LOWER/OMIT/UNDO. When the arrow is pointing at a string you can raise or lower the pitch of the string by RAISE/LOWER buttons. This is an effective way to create new tunings and see what chordal or scale possibilities are created. If you want to exclude all notes from a string press OMIT. Tapping notes from the note list will display them on the fretboard. UNDO will remove the last selected note from the fretboard.
How to create and work with snapshots:
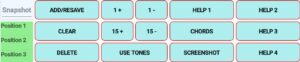

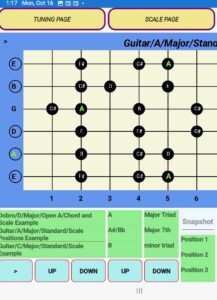
A snapshot is an image of the fretboard at a particular moment. Once you have given the snapshot a name you can save it by tapping the ADD/RESAVE button. Pressing CLEAR will clear the screen and DELETE will remove the snapshot from the Dictionary Item. The +/- buttons can be used to shrink or expand the fretboard. The USE TONES/USE NOTES will toggle between notes and chord or scale tones. The SCREENSHOT button will take a screenshot of just the fretboard and save it to your photo gallery. On the iOS platform this will unfortunately also take you out of the application but it’s still a nice feature to have.
Chord mode:

This is the app’s default mode. If you tap a note from the note list you can then tap a chord from the third list and it will be displayed on the fretboard. Tapping USE TONES will display the chord tones. The chord list is extensive and still growing. Perhaps at some point all the entries from Ted Greene’s “Chord Chemistry” will be available for perusal.
Scale Mode:
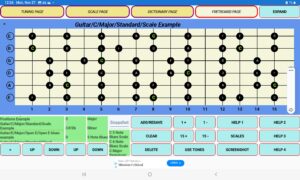

If you tap the CHORDS button it will change to SCALES and the third listbox will now contain a list of scales. Select a note from the note list. This will be your root note. Tap a scale and it will then be displayed for that root.
Diatonic mode:


Diatonic mode is the third option of the CHORDS/SCALES/DIATONIC button and requires some knowledge of music theory but is worth the effort. The major scale is heptatonic (7 notes) and the notes of the scale have roman numbers next to them. For any note of the scale you can construct the appropriate chord from the major scale and look at various extensions. You can also just examine the extensions for any note.